We use cookies to make your experience better. To comply with the new e-Privacy directive, we need to ask for your consent to set the cookies. Learn more.



Pad printing: how it works and when it’s the right choice
0%

Pad printing is the only technique that reliably transfers two-dimensional graphics onto a three-dimensional object. The silicone pad adapts to the shape when pressed, so you can print on flat, cylindrical, spherical, convex, concave, and even textured surfaces — pen bodies, rounded lighters, bottle caps, dashboard buttons.
Technically, this is indirect intaglio printing. The design is an indentation, not a raised area, and the ink reaches the product indirectly, via the pad. That’s why the technique is also called pad printing.
Another thing pad printing does better than other methods is fine detail. Thin lines and small text that would blur with screen printing remain sharp here. That’s why it’s the standard for logos on pens, where you only have a few millimeters of height.
But it’s not universal. The print area is limited by the pad size, each color requires its own setup, and photos are practically out of the question. Below you’ll find both — what the technique can do, and where it stops.
How does pad printing work?
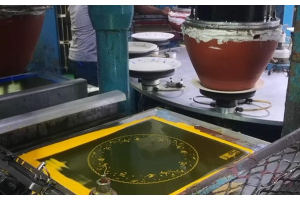
The design is etched into a cliché — a steel or polymer plate with a shallow groove for the graphic. One cycle works like this:
- Closed ink cup sits above the etched design and fills it with ink.
- The cup moves away, scraping excess ink from the cliché surface. Only the design holds ink.
- The pad lowers onto the cliché. As it presses, it pushes air out and lifts the ink from the groove onto itself.
- The pad lifts away with a thin ink film in the shape of the design. Some ink always remains in the cliché — transfer is never 100%.
- While the pad moves forward, the ink cup covers the cliché again and refills it for the next cycle.
- The pad presses onto the product and deposits the ink. Then it lifts and returns to the starting position.
Each color needs its own cliché and its own cycle. A two-color logo means two clichés, two setups, and precise alignment.
Why does the ink stick to the pad and then to the product?
This is the part that sounds like magic, but isn’t. The ink doesn’t stick to the pad because the pad is sticky — it sticks because the ink itself becomes tacky.
When the ink cup moves away, the top layer of ink in the design is exposed to air. The solvent starts evaporating immediately, forming a thin tacky film. This is what sticks to the silicone.
On the pad, the ink film changes again, so when it touches the product, it prefers to stick to the product rather than the pad. The whole process is a double transfer, driven by tackiness, not pressure. Silicone is used because ink doesn’t stick to it — it does its job and lets go.
For the same reason, climate control is part of the process, not just comfort. If the air is too dry, the solvent evaporates too quickly and the ink thickens prematurely; if it’s too humid, clumps form and the ink doesn’t pick up or transfer well. Humidity even affects whether the doctor blade glides smoothly or skips across a polymer cliché.
What machines and equipment are needed?
- Pad printing machine — single-color or multi-color, with multiple stations for several colors in one pass.
- Closed ink cup. An inverted cup with a ceramic ring and polished working surface, sealing against the cliché. It both floods and scrapes. The older version is an open ink trough with a flooding bar and doctor blade; the closed system evaporates less and gives more consistent prints throughout the run.
- Clichés. Polymer clichés are most common because they’re easy to work with, but last up to 50,000 prints. A hardened steel cliché lasts over a million and is used for very long runs.
- Cliché making device. The classic method is exposure with a film positive and chemical etching. The newer way is laser etching directly from file — faster, more precise, and with more stable quality control.
- Pad collection. Round, long and narrow, and in-between shapes, in small, medium, and large sizes, with different hardness levels. Harder pads for flat surfaces, softer for highly curved ones. For special cases, pads are custom-made. The pad shape determines what’s possible to print.
- Inks. Most often solvent-based, which need to be mixed with additives before use. There are also UV inks, which cure only under UV light and can be wiped off many substrates before curing — valuable if there’s a mistake. There are also heat-cured and two-component inks — with the latter, you have to use them within a few hours.
- Jigs and holders for the product. For unusual shapes, a custom holder is needed to keep the item in the same position every time — a hidden cost clients often don’t expect.
- Clean surface. The surface must be clean and residue-free, or the ink won’t adhere, no matter how well everything else is set up.
We do pad printing in-house and make our own clichés. This means we don’t wait for an outside supplier — with tight deadlines, this is often the difference between getting the job done or not.
What’s the process from artwork to delivery?
- Artwork received and checked. Vector, separated by color. If it comes as an image file, it needs to be redrawn.
- Color separation. One file per color, plus Pantone shade selection.
- Cliché made for each color.
- Machine setup. Product jigging, pad selection, artwork positioning, ink mixing.
- Test print and confirmation of position and shade.
- Production run, color by color.
- Drying and inspection. The ink is touch-dry in seconds, but fully cured much later — only then is the print truly durable.
- Packing and dispatch.
Steps 2 to 5 are the time-consuming ones the client never sees. That’s why small runs have a high unit price, and large runs a low one — setup is the same for 100 or 5,000 pieces.
Production time is 14 to 21 days, depending on the season. This applies to all our products, not just pad printing.
For fixed event dates, this is the number to count back from. An order placed three weeks before an event leaves no margin — not for artwork issues, not for color matching, not for a reprint if the first run isn’t right.
What can pad printing do — and what can’t it?
Why is pad printing the top choice for pens and lighters?
A pen is narrow, round, and offers only a few millimeters of height. A lighter is small, curved, and made of plastic that needs prepping. Both are exactly what pad printing is made for: small area, curved shape, fine detail, large runs.
For both, the ratio of print cost to product cost is favorable. Setup is the same as for more expensive items, but the product itself is cheap, so the total promo cost stays low — and both items actually get used every day, not left in a drawer.
The same applies to any product with a small or curved surface — from pens to accessories in business gifts:
| PRODUCTS | |
|---|---|
|
Classic ABS pen with twist mechanism. Narrow round body with a few millimeters of height for the design — exactly the surface pad printing is made for. |
Card case. Small plastic surface, too small for screen printing and just right for pad printing. |
|
Pesaro torch lighter in black. The casing is shaped for the hand, not for a printing machine, but the pad adapts to the curve and the logo stays legible. |
Wine set in natural finish. The logo goes on the actual accessories, not just the packaging — small, curved surfaces where screen printing fails. |
You’ll find our full range among plastic pens and classic keyrings. These are among the products we print most often with this technique.
How many colors can we print?
Up to four colors. This rule applies to all our spot color techniques, not just pad printing: each color needs its own cliché, setup, and cycle, so the price increases stepwise with every extra color.
Anything over four colors isn’t spot color anymore. That’s full-color printing, where the design is separated into process colors. If you need multi-color graphics on textiles, the answer is digital transfer; on metal or plastic, it’s UV printing.
An interesting detail most clients don’t know: you can get multiple tones from a single color by varying the etching depth or halftone density in the cliché. A single-color design can have lighter and darker areas without adding another cliché.
For multi-color prints, you have to consider registration — precise alignment of clichés. Because the pad deforms under pressure, logos where colors touch without an outline are trickier than those with some space between colors.
What kind of artwork do we need?
Vector — Illustrator, EPS, PDF with curves. Text converted to outlines. Colors specified by Pantone, not by how they look on screen.
What we regularly send back: logos as JPG or PNG, gradients and shadows, transparencies, and lines thinner than the cliché can hold. Gradients are only possible as halftones, and on small surfaces, the dot pattern is visible.
If there’s no vector, it has to be redrawn. This is a paid service, and it’s better to know in advance than to see it on the invoice.
Where are the limits: materials, size, and shape?
Silicone doesn’t hold ink — which is an advantage for the pad, but a problem for silicone products. Polypropylene and polyethylene only hold ink after flame or plasma treatment, or with a primer. Textile isn’t suitable for pad printing: fibers absorb ink unevenly and the result is patchy.
Size is a hard limit: the largest pad print area we offer is 60 × 60 mm. The pad has its own size and geometry, and when the design exceeds what the pad can pick up and deposit evenly, quality drops at the edges. Designs that need more require a different technique.
Shape is less limiting than you’d think. Concave and convex surfaces are fully doable, as are textured and multi-angled ones — the pad adapts to the curve. What it can’t handle are sharp steps and deep, narrow recesses where the silicone can’t reach the bottom.
Pad printing or screen printing?
It’s not about quantity. Size and precision are what matter.
It’s difficult or impossible to print a lighter or ballpoint pen with screen printing. The screen needs a flat surface and enough space, which these products don’t have. Pad printing works on small, curved, and irregular surfaces and keeps fine detail — so it’s really the only serious option for these items.
Screen printing is for flat, large surfaces: T-shirts, bags, folders, bigger flat panels. It gives a thicker, more opaque print and covers large areas evenly, which pad printing can’t do at that scale.
So the limit is physical, not price-based. Up to 60 × 60 mm and curved shapes on one side, flat surfaces without that limit on the other. If someone offers you screen printing on a pen, ask how.
From ceramics to keyboards
Where does pad printing come from?
Crude forms of pad transfer are centuries old, but the usable technology was developed in the 20th century.
The breakthrough was the Murray Curvex process, developed in the late 1940s and early 1950s by the British company Malkin Tile Works. Before that, patterns on plates and cups were applied by hand or with time-consuming paper transfers. The new device used a soft gelatin or silicone pad to pick up ink from a flat etched plate and press it onto the curved surface of the ware. This allowed the ceramics industry to quickly and evenly decorate curved surfaces, and by mid-century, the machine was a fixture in Staffordshire potteries.
At the same time, the technique caught on in watchmaking after World War II, for printing dials. The real boom came in the late 1960s and 1970s, when silicone pads and better machines made the process truly practical. That’s when it became possible to print on surfaces that were previously unreachable — and pad printing entered mass production.
Where have you seen it without realizing?
Probably every day, and you almost certainly don’t know you’re looking at pad printing:
- letters on keyboards and calculator keys
- logos on golf balls and hockey pucks
- watch dials
- toys — graphics on Hot Wheels and Matchbox cars
- medical devices: syringes, surgical instruments, catheter tubes, contact lenses
- tablets and candies — for this, there are FDA-approved edible inks
- automotive parts: indicators, buttons, and switches on dashboards
- bottle caps and stoppers, cosmetic packaging
- serial numbers and identification marks on devices
- shoe heels
The technique isn’t just for ink. The same process is used to apply conductive pastes, adhesives, dyes, and lubricants — wherever a precise amount needs to be placed exactly.
On promotional products, the reason for using it is the same as on a keyboard: a small, precise, durable print on an object that isn’t flat.
Recent Posts